在本文中,我们将研究FastText,它是用于单词嵌入和文本分类的另一个极其有用的模块。
在本文中,我们将简要探讨FastText库。本文分为两个部分。
在第一部分中,我们将看到FastText库如何创建向量表示形式,该向量表示形式可用于查找单词之间的语义相似性。
简单来说,自然语言处理(NLP)就是开发能够理解人类语言的应用程序或服务。
这里讨论一些自然语言处理(NLP)的实际应用例子,如语音识别、语音翻译、理解完整的句子、理解匹配词的同义词,以及生成语法正确完整句子和段落。
这并不是NLP能做的所有事情。
NLP实现
搜索引擎: 比如谷歌,Yahoo等。谷歌搜索引擎知道你是一个技术人员,所以它显示与技术相关的结果;
社交网站推送:比如Facebook News Feed。如果News Feed算法知道你的兴趣是自然语言处理,就会显示相关的广告和帖子。
语音引擎:比如Apple的Siri。
垃圾邮件过滤:如谷歌垃圾邮件过滤器。和普通垃圾邮件过滤不同,它通过了解邮件内容里面的的深层意义,来判断是不是垃圾邮件。
NLP库
下面是一些开源的自然语言处理库(NLP):
Natural language toolkit (NLTK);
Apache OpenNLP;
Stanford NLP suite;
Gate NLP library
其中自然语言工具包(NLTK)是最受欢迎的自然语言处理库(NLP),它是用Python编写的,而且背后有非常强大的社区支持。
NLTK也很容易上手,实际上,它是最简单的自然语言处理(NLP)库。
在第二部分中,我们将看到FastText库在文本分类中的应用。
语义相似性的FastText
FastText支持词袋和Skip-Gram模型。在本文中,我们将实现skip-gram模型,由于这些主题非常相似,因此我们选择这些主题以拥有大量数据来创建语料库。您可以根据需要添加更多类似性质的主题。
第一步,我们需要导入所需的库。
$ pip install wikipedia
导入库
以下脚本将所需的库导入我们的应用程序:
from keras.preprocessing.text import Tokenizer
from gensim.models.fasttext import FastText
import numpy as np
import matplotlib.pyplot as plt
import nltk
from string import punctuation
from nltk.corpus import stopwords
from nltk.tokenize import word_tokenize
from nltk.stem import WordNetLemmatizer
from nltk.tokenize import sent_tokenize
from nltk import WordPunctTokenizer

import wikipedia
import nltk
nltk.download('punkt')
nltk.download('wordnet')
nltk.download('stopwords')
en_stop = set(nltk.corpus.stopwords.words('english'))

%matplotlib inline
维基百科文章
在这一步中,我们将抓取所需的Wikipedia文章。看下面的脚本:
artificial_intelligence = wikipedia.page("Artificial Intelligence").content
machine_learning = wikipedia.page("Machine Learning").content
deep_learning = wikipedia.page("Deep Learning").content
neural_network = wikipedia.page("Neural Network").content

artificial_intelligence = sent_tokenize(artificial_intelligence)
machine_learning = sent_tokenize(machine_learning)
deep_learning = sent_tokenize(deep_learning)
neural_network = sent_tokenize(neural_network)

artificial_intelligence.extend(machine_learning)
artificial_intelligence.extend(deep_learning)
artificial_intelligence.extend(neural_network)
要抓取Wikipedia页面,我们可以使用模块中的page方法wikipedia。您要剪贴的页面名称作为参数传递给page方法。该方法返回WikipediaPage对象,然后您可以使用该对象通过content属性来检索页面内容,如上面的脚本所示。

然后使用该sent_tokenize方法将来自四个Wikipedia页面的抓取的内容标记为句子。该sent_tokenize方法返回句子列表。四个页面的句子分别标记。最后,通过该extend方法将四篇文章中的句子连接在一起。
数据预处理
下一步是通过删除标点符号和数字来清除文本数据。
随时关注您喜欢的主题
preprocess_text如下定义的功能执行预处理任务。
import re
from nltk.stem import WordNetLemmatizer

stemmer = WordNetLemmatizer()

def preprocess_text(document):


        preprocessed_text = ' '.join(tokens)

        return preprocessed_text
让我们看看我们的函数是否通过预处理一个伪句子来执行所需的任务:
sent = preprocess_text("Artificial intelligence, is the most advanced technology of the present era")
print(sent)
预处理语句如下所示:
artificial intelligence advanced technology present
您会看到标点符号和停用词已被删除。
创建单词表示
我们已经对语料库进行了预处理。现在是时候使用FastText创建单词表示形式了。首先让我们为FastText模型定义超参数:
embedding_size = 60
window_size = 40
min_word = 5
down_sampling = 1e-2
这embedding_size是嵌入向量的大小。
下一个超参数是min_word,它指定语料库中单词生成的最小频率。最后,最频繁出现的单词将通过down_sampling属性指定的数字进行下采样。
现在让我们FastText为单词表示创建模型。
%%time
ft_model = FastText(word_tokenized_corpus,
                      size=embedding_size,
                      window=window_size,
                      min_count=min_word,
                      sample=down_sampling,
                      sg=1,
                      iter=100)
该sg参数定义了我们要创建模型的类型。值为1表示我们要创建跳跃语法模型。零指定单词袋模型,这也是默认值。
执行上面的脚本。运行可能需要一些时间。在我的机器上,上述代码运行的时间统计信息如下:
CPU times: user 1min 45s, sys: 434 ms, total: 1min 45s
Wall time: 57.2 s
print(ft_model.wv['artificial'])
这是输出:
[-3.7653010e-02 -4.5558015e-01  3.2035065e-01 -1.5289043e-01
  4.0645871e-02 -1.8946664e-01  7.0426887e-01  2.8806925e-01
 -1.8166199e-01  1.7566417e-01  1.1522485e-01 -3.6525184e-01
 -6.4378887e-01 -1.6650060e-01  7.4625671e-01 -4.8166099e-01
  2.0884991e-01  1.8067230e-01 -6.2647951e-01  2.7614883e-01
 -3.6478557e-02  1.4782918e-02 -3.3124462e-01  1.9372456e-01
  4.3028224e-02 -8.2326338e-02  1.0356739e-01  4.0792203e-01
 -2.0596240e-02 -3.5974573e-02  9.9928051e-02  1.7191900e-01
 -2.1196717e-01  6.4424530e-02 -4.4705093e-02  9.7391091e-02
 -2.8846195e-01  8.8607501e-03  1.6520244e-01 -3.6626378e-01
 -6.2017748e-04 -1.5083785e-01 -1.7499258e-01  7.1994811e-02
 -1.9868813e-01 -3.1733567e-01  1.9832127e-01  1.2799081e-01
 -7.6522082e-01  5.2335665e-02 -4.5766738e-01 -2.7947658e-01
  3.7890410e-03 -3.8761377e-01 -9.3001537e-02 -1.7128626e-01
 -1.2923178e-01  3.9627206e-01 -3.6673656e-01  2.2755004e-01]
现在让我们找到“人造”,“智能”,“机器”,“网络”,“经常出现”,“深度”这五个最相似的词。您可以选择任意数量的单词。以下脚本将打印指定的单词以及5个最相似的单词。
for k,v in semantically_similar_words.items():
    print(k+":"+str(v))
输出如下:
artificial:['intelligence', 'inspired', 'book', 'academic', 'biological']
intelligence:['artificial', 'human', 'people', 'intelligent', 'general']
machine:['ethic', 'learning', 'concerned', 'argument', 'intelligence']
network:['neural', 'forward', 'deep', 'backpropagation', 'hidden']
recurrent:['rnns', 'short', 'schmidhuber', 'shown', 'feedforward']
deep:['convolutional', 'speech', 'network', 'generative', 'neural']
我们还可以找到任意两个单词的向量之间的余弦相似度,如下所示:
print(ft_model.wv.similarity(w1='artificial', w2='intelligence'))
输出显示值为“ 0.7481”。该值可以介于0到1之间。更高的值表示更高的相似度。
可视化单词相似性
尽管模型中的每个单词都表示为60维向量,但是我们可以使用主成分分析技术来找到两个主成分。然后可以使用两个主要成分在二维空间中绘制单词。
print(all_similar_words)
print(type(all_similar_words))
print(len(all_similar_words))
字典中的每个键都是一个单词。相应的值是所有语义相似的单词的列表。由于我们在“人工”,“智能”,“机器”,“网络”,“经常性”,“深度”这6个词的列表中找到了前5个最相似的词,因此您会发现其中有30个词该all_similar_words列表。
接下来,我们必须找到所有这30个单词的单词向量,然后使用PCA将单词向量的维数从60减小到2。然后可以使用plt方法,该matplotlib.pyplot方法是绘制单词的方法的别名在二维向量空间上。
执行以下脚本以可视化单词:
word_vectors = ft_model.wv[all_similar_words]


for word_names, x, y in zip(word_names, p_comps[:, 0], p_comps[:, 1]):
    plt.annotate(word_names, xy=(x+0.06, y+0.03), xytext=(0, 0), textcoords='offset points')
上面脚本的输出如下所示:
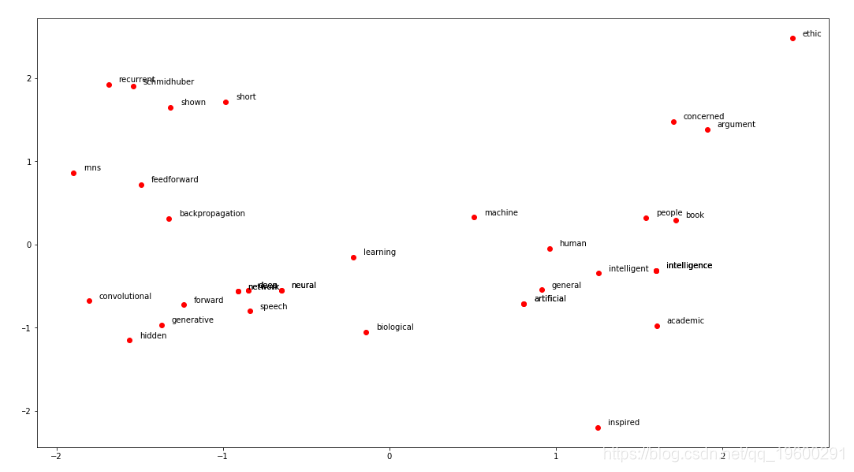
可以看到在文本中经常一起出现的单词在二维平面中也彼此靠近。
用于文本分类的FastText
文本分类是指根据文本的内容将文本数据分类为预定义的类别。情感分析,垃圾邮件检测和标签检测是一些用于文本分类的用例的最常见示例。
数据集
数据集包含多个文件,但我们仅对该yelp_review.csv文件感兴趣。该文件包含有关不同业务(包括餐馆,酒吧,牙医,医生,美容院等)的520万条评论。但是,由于内存限制,我们将仅使用前50,000条记录来训练我们的模型。如果需要,可以尝试更多记录。
让我们导入所需的库并加载数据集:
import pandas as pd
import numpy as np

yelp_reviews = pd.read_csv("/content/drive/My Drive/Colab Datasets/yelp_review_short.csv")
在上面的脚本中,我们yelp_review_short.csv使用pd.read_csv函数加载了包含50,000条评论的文件。
通过将评论的数值转换为分类数值,可以简化我们的问题。这将通过在reviews_score数据集中添加新的列来完成。
最后,数据帧的标题如下所示

安装FastText
下一步是导入FastText模型,可以使用以下wget命令从GitHub存储库中导入该命令,如以下脚本所示:
!wget https://github.com/facebookresearch/fastText/archive/v0.1.0.zip
如果您运行上述脚本并看到以下结果,则表明FastText已成功下载:
--2019-08-16 15:05:05--  https://github.com/facebookresearch/fastText/archive/v0.1.0.zip
Resolving github.com (github.com)... 140.82.113.4
Connecting to github.com (github.com)|140.82.113.4|:443... connected.
HTTP request sent, awaiting response... 302 Found
Location: https://codeload.github.com/facebookresearch/fastText/zip/v0.1.0 [following]
--2019-08-16 15:05:05--  https://codeload.github.com/facebookresearch/fastText/zip/v0.1.0
Resolving codeload.github.com (codeload.github.com)... 192.30.255.121
Connecting to codeload.github.com (codeload.github.com)|192.30.255.121|:443... connected.
HTTP request sent, awaiting response... 200 OK
Length: unspecified [application/zip]
Saving to: ‘v0.1.0.zip’

v0.1.0.zip              [ <=>                ]  92.06K  --.-KB/s    in 0.03s

2019-08-16 15:05:05 (3.26 MB/s) - ‘v0.1.0.zip’ saved [94267]
下一步是解压缩FastText模块。只需键入以下命令:
!unzip v0.1.0.zip
接下来,您必须导航到下载FastText的目录,然后执行!make命令以运行C ++二进制文件。执行以下步骤:
cd fastText-0.1.0
!make
如果看到以下输出,则表明FastText已成功安装在您的计算机上。
c++ -pthread -std=c++0x -O3 -funroll-loops -c src/args.cc
c++ -pthread -std=c++0x -O3 -funroll-loops -c src/dictionary.cc
c++ -pthread -std=c++0x -O3 -funroll-loops -c src/productquantizer.cc
c++ -pthread -std=c++0x -O3 -funroll-loops -c src/matrix.cc
c++ -pthread -std=c++0x -O3 -funroll-loops -c src/qmatrix.cc
c++ -pthread -std=c++0x -O3 -funroll-loops -c src/vector.cc
c++ -pthread -std=c++0x -O3 -funroll-loops -c src/model.cc
c++ -pthread -std=c++0x -O3 -funroll-loops -c src/utils.cc
c++ -pthread -std=c++0x -O3 -funroll-loops -c src/fasttext.cc
c++ -pthread -std=c++0x -O3 -funroll-loops args.o dictionary.o productquantizer.o matrix.o qmatrix.o vector.o model.o utils.o fasttext.o src/main.cc -o fasttext
要验证安装,请执行以下命令:
!./fasttext
您应该看到FastText支持以下命令:
usage: fasttext <command> <args>

The commands supported by FastText are:

  supervised              train a supervised classifier
  quantize                quantize a model to reduce the memory usage
  test                    evaluate a supervised classifier
  predict                 predict most likely labels
  predict-prob            predict most likely labels with probabilities
  skipgram                train a skipgram model
  cbow                    train a cbow model
  print-word-vectors      print word vectors given a trained model
  print-sentence-vectors  print sentence vectors given a trained model
  nn                      query for nearest neighbors
  analogies               query for analogies
文字分类
在训练FastText模型进行文本分类之前,需要先提及FastText接受特殊格式的数据,具体如下:
_label_tag This is sentence 1
_label_tag2 This is sentence 2.
如果我们查看我们的数据集,它不是所需的格式。具有积极情绪的文本应如下所示:
__label__positive burgers are very big portions here.
同样,负面评论应如下所示:
__label__negative They do not use organic ingredients, but I thi...
以下脚本从数据集中过滤出reviews_score和text列,然后__label__在该reviews_score列中的所有值之前添加前缀。类似地,\n和\t被text列中的空格替换。最后,更新后的数据帧以的形式写入yelp_reviews_updated.txt。
import pandas as pd
from io import StringIO
import csv

col = ['reviews_score', 'text']
现在让我们打印更新后的yelp_reviews数据框。
yelp_reviews.head()
您应该看到以下结果:
reviews_score   text
0   __label__positive   Super simple place but amazing nonetheless. It...
1   __label__positive   Small unassuming place that changes their menu...
2   __label__positive   Lester's is located in a beautiful neighborhoo...
3   __label__positive   Love coming here. Yes the place always needs t...
4   __label__positive   Had their chocolate almond croissant and it wa...
同样,数据框的尾部如下所示:
    reviews_score   text
49995   __label__positive   This is an awesome consignment store! They hav...
49996   __label__positive   Awesome laid back atmosphere with made-to-orde...
49997   __label__positive   Today was my first appointment and I can hones...
49998   __label__positive   I love this chic salon. They use the best prod...
49999   __label__positive   This place is delicious. All their meats and s...
我们已经将数据集转换为所需的形状。下一步是将我们的数据分为训练集和测试集。80%的数据(即50,000条记录中的前40,000条记录)将用于训练数据,而20%的数据(最后10,000条记录)将用于评估算法的性能。
以下脚本将数据分为训练集和测试集:
!head -n 40000 "/content/drive/My Drive/Colab Datasets/yelp_reviews_updated.txt" > "/content/drive/My Drive/Colab Datasets/yelp_reviews_train.txt"
!tail -n 10000 "/content/drive/My Drive/Colab Datasets/yelp_reviews_updated.txt" > "/content/drive/My Drive/Colab Datasets/yelp_reviews_test.txt"
yelp_reviews_train.txt便会生成包含训练数据的文件。同样,新生成的yelp_reviews_test.txt文件将包含测试数据。
现在是时候训练我们的FastText文本分类算法了。
%%time
!./fasttext supervised -input "/content/drive/My Drive/Colab Datasets/yelp_reviews_train.txt" -output model_yelp_reviews
为了训练算法,我们必须使用supervised命令并将其传递给输入文件。这是上面脚本的输出:
Read 4M words
Number of words:  177864
Number of labels: 2
Progress: 100.0%  words/sec/thread: 2548017  lr: 0.000000  loss: 0.246120  eta: 0h0m
CPU times: user 212 ms, sys: 48.6 ms, total: 261 ms
Wall time: 15.6 s
您可以通过以下!ls命令查看模型:
!ls
这是输出:
args.o             Makefile         quantization-results.sh
classification-example.sh  matrix.o         README.md
classification-results.sh  model.o          src
CONTRIBUTING.md        model_yelp_reviews.bin   tutorials
dictionary.o           model_yelp_reviews.vec   utils.o
eval.py            PATENTS          vector.o
fasttext           pretrained-vectors.md    wikifil.pl
fasttext.o         productquantizer.o       word-vector-example.sh
get-wikimedia.sh       qmatrix.o            yelp_reviews_train.txt
LICENSE            quantization-example.sh
可以model_yelp_reviews.bin在上面的文档列表中看到。
最后,可以使用以下test命令测试模型。必须在test命令后指定型号名称和测试文件,如下所示:
!./fasttext test model_yelp_reviews.bin "/content/drive/My Drive/Colab Datasets/yelp_reviews_test.txt"
上面脚本的输出如下所示:
N   10000
P@1 0.909
R@1 0.909
Number of examples: 10000
这里P@1是指精度,R@1是指召回率。您可以看到我们的模型达到了0.909的精度和召回率,这相当不错。
现在,让我们尝试清除标点符号和特殊字符的文本,并将其转换为小写字母,以提高文本的一致性。
!cat "/content/drive/My Drive/Colab Datasets/yelp_reviews_train.txt" | sed -e "s/\([.\!?,’/()]\)/ \1 /g" | tr "[:upper:]" "[:lower:]" > "/content/drive/My Drive/Colab Datasets/yelp_reviews_train_clean.txt"
并且以下脚本清除了测试集:
"/content/drive/My Drive/Colab Datasets/yelp_reviews_test.txt" | sed -e "s/\([.\!?,’/()]\)/ \1 /g" | tr "[:upper:]" "[:lower:]" > "/content/drive/My Drive/Colab Datasets/yelp_reviews_test_clean.txt"
现在,我们将在清理的训练集上训练模型:
%%time
!./fasttext supervised -input "/content/drive/My Drive/Colab Datasets/yelp_reviews_train_clean.txt" -output model_yelp_reviews
最后,我们将使用在净化训练集上训练的模型对测试集进行预测:
!./fasttext test model_yelp_reviews.bin "/content/drive/My Drive/Colab Datasets/yelp_reviews_test_clean.txt"
上面脚本的输出如下:
N   10000
P@1 0.915
R@1 0.915
Number of examples: 10000
您会看到精度和召回率都有小幅提高。为了进一步改善模型,您可以增加模型的时代和学习率。以下脚本将元数设置为30,将学习率设置为0.5。
%%time
!./fasttext supervised -input "/content/drive/My Drive/Colab Datasets/yelp_reviews_train_clean.txt" -output model_yelp_reviews -epoch 30 -lr 0.5
结论
最近,已证明FastText模型可用于许多数据集上的单词嵌入和文本分类任务。与其他单词嵌入模型相比,它非常易于使用并且闪电般快速。
可下载资源
关于作者
Kaizong Ye是拓端研究室(TRL)的研究员。在此对他对本文所作的贡献表示诚挚感谢,他在上海财经大学完成了统计学专业的硕士学位,专注人工智能领域。擅长Python.Matlab仿真、视觉处理、神经网络、数据分析。
本文借鉴了作者最近为《R语言数据分析挖掘必知必会 》课堂做的准备。
非常感谢您阅读本文,如需帮助请联系我们!
 Python基于SVM和RankGauss的低消费指数构建模型
 【视频】Python用GM(1,1)灰色模型预测模型对电力预测
 R语言自然语言处理NLP:文本挖掘情感分析上市公司文本信息知识发现可视化
 Python、MATLAB股票投资:ARIMA模型最优的选股方案和投资组合方案与预测